SoftwareGlimpse
CRM Software

Zendesk Sell Setup: Day-Zero Path to a Working Pipeline

Set up Zendesk Sell for day-zero selling — pipeline, users, email sync, and the first logged activity — before optional marketplace apps.

By Lee M.Updated Aug 14, 202611 min readFact-checked

Quick answer

Set up Zendesk Sell in this order: pick a plan that covers day-one needs, name one admin, configure one pipeline, invite daily users, connect email, then have a non-admin create a deal, log activity, and move a stage. You’re done when that walkthrough works — not when every module is switched on.

  • Start on Team
  • Name one admin
  • One pipeline only
  • Connect email
  • Invite daily users
  • Prove a seller can run it

Zendesk Sell day-zero setup media

Verified captures and vendor tutorials for configuring Zendesk Sell before go-live — pipeline, contacts, and first workflows.

Official Zendesk Sell setup walkthrough

Vendor tutorial for onboarding and configuration. It is not a SoftwareGlimpse rollout plan — use this guide for judgment.

This video is hosted on YouTube

This content is hosted by YouTube. The player loads only after you allow marketing cookies.

Official vendor tutorial

Zendesk Sell: Mobile App Demo

What this shows

  • Zendesk Sell mobile CRM navigation and deal updates
  • On-the-go pipeline and contact workflows from Zendesk
Product screenshots

Product screenshots coming soon

We only publish verified captures from Zendesk Sell's product interface — never stock images, mockups, or teaching diagrams. Screenshots appear here once editorial review confirms them.

Full product screenshots and evidence live on the Zendesk Sell research page.

What matters in your Zendesk Sell setup

  • What Zendesk Sell actually is Zendesk Sell sales CRM with Team through Enterprise annual per-agent plans for pipeline and sales engagement.
  • Configure these first Research lists contact management, lead management, pipeline management, and deal management as supported — that is your day-zero surface. Editorial key features: Sales pipeline management, Email and calling workflows, Reporting, and Zendesk ecosystem links.
  • Check the gates before you promise Our research does not flag plan-gated capabilities for Zendesk Sell, but confirm your must-haves against the plan you actually intend to buy.
  • Start on the right plan Researched plans: Team, Growth, Professional, Enterprise.
  • Connect only what the loop needs Our research does not name specific Zendesk Sell integrations, so verify each connector you depend on in the vendor's integration directory before go-live.
  • AI comes after habits Zendesk Sell research mentions AI assistance without naming capabilities. Research places AI assistance on Team, Growth, Professional, and Enterprise. Leave it off until the manual loop is boring and reliable.

Zendesk Sell day-zero path

  1. 1Qualify
  2. 2Admin owner
  3. 3Objects
  4. 4Roles
  5. 5Email
  6. 6Non-admin

Zendesk Sell setup walkthrough

Zendesk Sell setup walkthrough diagram.
Finish the Zendesk Sell core loop — contact management, lead management, pipeline management, and deal management — before optional modules.

Zendesk Sell: must-have vs nice-to-have

Must-have
  • One pipeline + required fields
  • email sync
  • Non-admin loop proof
Nice-to-have
  • workflow automation
  • AI assistance

Zendesk Sell checklist

Bring these questions to every demo

Ask vendors to show the workflow live, not just describe it.

  • 1Qualify the Zendesk Sell planDay-one must-haves on the cheapest researched tier.
  • 2Name one admin ownerTwo hours a week for fields, users, hygiene.
  • 3Configure one pipeline5–7 buyer-verifiable stages + required fields.
  • 4Invite daily users onlyLeast privilege; spectators wait.
  • 5Connect email and calendarPlus one daily tool — document the rest as gaps.
  • 6Prove the non-admin loopCreate · log · move — then write the setup note.

1. Start on the Zendesk Sell plan your must-haves need

Zendesk Sell setup diagram 1.
Plan choice decides what you can configure in Zendesk Sell at all.
  • Entry plan

    Our snapshot lists no free Zendesk Sell plan — Team is the floor. Verify on the pricing page.

  • Qualifying paid plan

    Team upward — stay on the cheapest one that clears every must-have gate.

  • Quote-only tier

    No quote-only tier appears in our Zendesk Sell snapshot; treat any sales-only promise as unconfirmed.

Write five day-one jobs, map each to a researched Zendesk Sell plan, and pick the cheapest tier that covers all five.

  1. List the five things sellers must do on day one.
  2. Match each one to a researched Zendesk Sell plan. Our research does not flag plan-gated capabilities for Zendesk Sell, but confirm your must-haves against the plan you actually intend to buy.
  3. Pick the cheapest plan that covers all five.
  4. Check capacity, not just features. Confirm seat/record caps for Zendesk Sell before inviting everyone.

Our snapshot flags a trial on Team, Growth, and Professional without a published length — confirm the window on the Zendesk Sell pricing page.

Worked example: a 12-person B2B advisory team needs contact management, lead management, pipeline management, and deal management plus email sync on day one in Zendesk Sell. They start on Team and note which capabilities would force an upgrade.

2. Create the workspace and name one admin owner

Zendesk Sell setup diagram 1.
Name one Zendesk Sell admin owner before you invite the rest of the team.
  • Admin owner

    Fields, users, integrations, and data hygiene in Zendesk Sell.

  • Sales champion

    Owns stage definitions and what “next step” means.

  • Executive sponsor

    Clears blockers; does not redesign the data model midweek.

Name one admin — not a committee — before you invite sellers.

  1. Create the workspace with real company name, currency, and timezone.
  2. Name one admin with ~2 hours a week for fields, users, and hygiene.
  3. Agree: new fields and pipelines go through that admin only.
  4. In Zendesk Sell, open workspace or account settings — confirm the current control labels in the product, docs, or trial.

Worked example: a 12-person B2B advisory team makes ops the Zendesk Sell admin, writes the two-hour commitment into the week, and blocks everyone else from adding fields for 30 days.

3. Model your data and exactly one pipeline in Zendesk Sell

Zendesk Sell setup diagram 2.
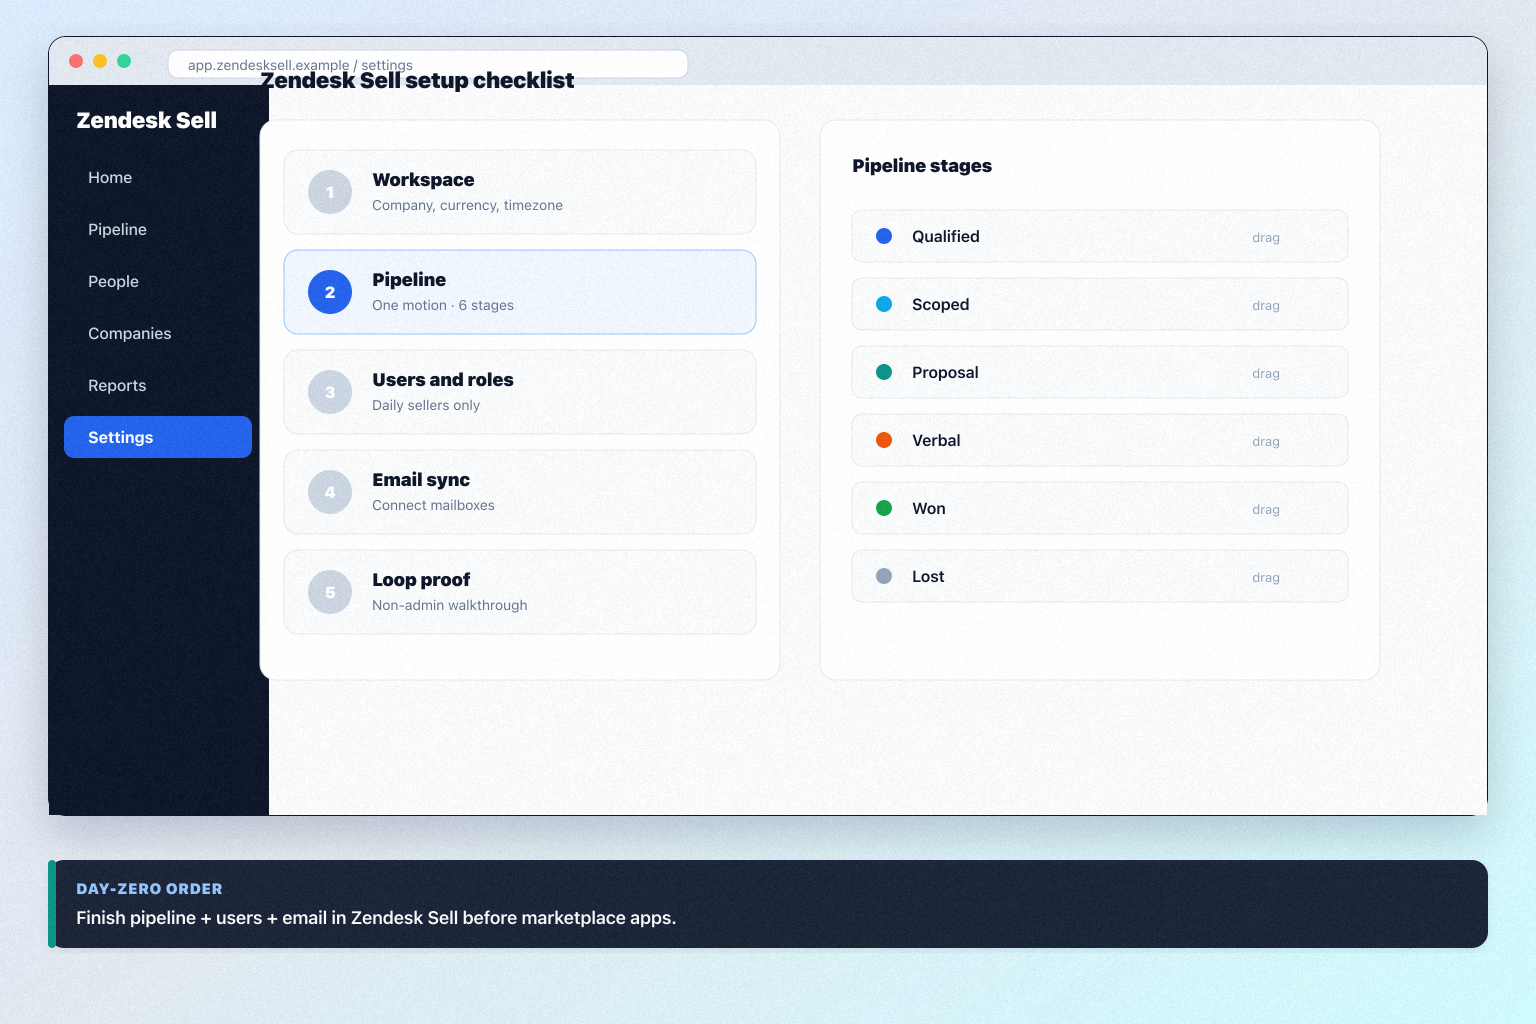
One Zendesk Sell pipeline and four required fields beat a crowded data model.
  • One motion first

    A second pipeline in Zendesk Sell can wait until the first one is honest.

  • Required fields

    Owner, next step, next-step date, expected close — that is it.

  • Archive, do not recreate

    Legacy fields you will not use belong in an export, not the new workspace.

Research confirms contact management, lead management, pipeline management, and deal management for Zendesk Sell — that is the surface you are configuring here.

  1. Decide what a company, a person, and a deal mean in your business, then mirror that in Zendesk Sell. Contact management is researched across every Zendesk Sell plan we snapshot.
  2. Build one pipeline for your main motion. Pipeline management is researched across every Zendesk Sell plan we snapshot.
  3. Use five to seven stages named after buyer-verifiable events, not internal feelings.
  4. Add only the required fields Friday's review needs: owner, next step, next-step date, expected close.
  5. In Zendesk Sell, open the objects, pipeline, or deal configuration area — confirm the current control labels in the product, docs, or trial.

Worked example: a 12-person B2B advisory team configures six stages in Zendesk Sell (qualified, scoped, proposal, verbal, won, lost), makes “next step” required, and refuses every other custom field until after go-live.

4. Invite daily users and set least-privilege roles

Zendesk Sell setup diagram 4.
Invite Zendesk Sell daily users with least privilege — keep admin scarce.
  • Daily users in

    Anyone who owns a deal or logs activity.

  • Viewers wait

    Read-only curiosity is not worth a paid seat in week one.

  • Admin rights scarce

    One or two admins maximum; everyone else requests changes.

Invite people who touch deals daily. Spectators can wait.

  1. Invite daily users only — viewers often burn paid seats.
  2. Sellers get standard access; admin stays with the owner from step 2.
  3. Count seats against research capacity. Confirm Zendesk Sell seat caps before you invite.
  4. In Zendesk Sell, open the members, users, or permissions area — confirm the current control labels in the product, docs, or trial.
  5. Log in as a non-admin and prove you can create a deal.

Worked example: a 12-person B2B advisory team invites eight sellers, two managers, and ops into Zendesk Sell; part-time analysts wait until someone proves they need a seat.

5. Connect email, calendar, and the first integrations

Zendesk Sell setup diagram 3.
Connect email, calendar, and one daily tool in Zendesk Sell — defer the rest.
  • Connect now

    Email, calendar, and the one tool sellers open every day.

  • Connect later

    Finance, document, and reporting tools after adoption holds.

  • Document the gap

    Anything Zendesk Sell research does not confirm goes on the risk list, not the launch deck.

  1. Connect email and calendar for the people who own deals. Email sync is researched across every Zendesk Sell plan we snapshot.
  2. Our research does not name specific Zendesk Sell integrations, so verify each connector you depend on in the vendor's integration directory before go-live.
  3. Connect nothing else. Every extra connector is another thing to debug during onboarding week.
  4. Write down what is not connected. A documented gap is fine; a pretended integration is not.
  5. In Zendesk Sell, open the integrations or connected-apps area — confirm the current control labels in the product, docs, or trial.

Worked example: a 12-person B2B advisory team connects mailboxes and their calendar in Zendesk Sell, then postpones accounting and document tools until the 30-day adoption review.

6. Prove the non-admin loop, then write the setup note

Zendesk Sell setup diagram 4.
Zendesk Sell setup is done only after a non-admin completes the loop unaided.
  1. Pick a seller who is not an admin. Watch them create a company and contact, create a deal on the pipeline, log a call or email, set a next step, and move a stage in Zendesk Sell.
  2. Fix whatever they had to ask about — that friction is your real training backlog.
  3. Run the same loop on mobile if that matters. Mobile app is researched across every Zendesk Sell plan we snapshot.
  4. Write a one-page setup note: plan, stage definitions, required fields, admin owner, sync status, known gaps.
  5. Hand that note to the Zendesk Sell implementation guide and schedule training on the same pipeline.

Worked example: a 12-person B2B advisory team's founder completes the loop in Zendesk Sell without ops help, ops writes the one-pager, and only then does the team announce go-live.

Zendesk Sell setup mistakes

  • Installing integrations before the pipeline works

    Connector logos are not a sales process. Get contact management, lead management, pipeline management, and deal management right in Zendesk Sell first.

  • Copying a 20-stage template

    Stages nobody can verify from the buyer's side become noise, then get ignored.

  • Testing only as an admin

    Admin accounts hide the permission and visibility problems sellers hit on day one.

  • Configuring a capability your plan does not include

    Our research does not flag plan-gated capabilities for Zendesk Sell, but confirm your must-haves against the plan you actually intend to buy. Check the Zendesk Sell plans guide before you design around a gated feature.

  • Inviting everyone at once

    Seats and capacity are researched limits, not suggestions. Confirm caps on the pricing page before a bulk invite.

  • Designing around a known weak spot

    Research flags: Price jumps across tiers. Plan for it during setup instead of discovering it in month two.

Frequently asked questions

  • How do I set up Zendesk Sell quickly?

    Qualify the plan, create the workspace with one admin owner, model contact management, lead management, pipeline management, and deal management with a single pipeline, invite daily users, connect email and calendar, then prove the loop as a non-admin. Decision rule: no non-admin loop proof means setup is not finished.

  • Which Zendesk Sell plan should I set up on?

    Researched plans are Team, Growth, Professional, Enterprise. Pick the cheapest one that carries every day-one must-have — Our research does not flag plan-gated capabilities for Zendesk Sell, but confirm your must-haves against the plan you actually intend to buy. See the Zendesk Sell plans guide for the full selection algorithm.

  • Does Zendesk Sell email sync work on every plan?

    Email sync is researched across every Zendesk Sell plan we snapshot. Confirm current packaging on the pricing page before go-live.

  • How long should setup take?

    A focused small team can finish this six-step path in days, not quarters — the delay is usually agreeing stage definitions, not clicking. Our snapshot flags a trial on Team, Growth, and Professional without a published length — confirm the window on the Zendesk Sell pricing page.

  • Should we import all our data during setup?

    No. Start with a small clean working set so you can prove the loop, then run the Zendesk Sell migration guide's pilot before bulk import.

  • Which integrations should we connect first in Zendesk Sell?

    Our research does not name specific Zendesk Sell integrations, so verify each connector you depend on in the vendor's integration directory before go-live. Connect email and calendar, plus the one tool sellers already open daily. Everything else waits for the 30-day review.

  • Should we turn on AI features while setting up Zendesk Sell?

    Zendesk Sell research mentions AI assistance without naming capabilities. Research places AI assistance on Team, Growth, Professional, and Enterprise. Leave assistance off until the manual loop is reliable — otherwise you cannot tell whether the AI or the process caused a result.

  • What should I do next?

    Continue with the Zendesk Sell implementation guide for the 30/60/90 adoption gates, or the migration guide if you are moving history from another system.

Was this article helpful?

Have more questions? Contact our support team.

SoftwareGlimpse Updates

Want clearer software shortlists? Get buying guides and comparisons by email.

Newsletter coming soon.